Microsoft announced Azure AD Verifiable Credentials a month ago. It is a platform you can use to design and issue verifiable credentials to represent proof of employment, education or any other claim. Holder of the credential can decide who to share their credentials with and they can present credentials by using Microsoft Authenticator. Credentials is signed by using cryptographic keys associated with the DID that the user owns and controls.
Here is a good link to the documentation that explains how it works in detail:
I added a custom domain (vc.bay.fi) to CDN (cdnverify.bay.fi is needed for verification).
I downloaded the did-configration.json file from the Verifiable Credentials Settings.
Uploaded the file to $web container in my Storage Account.
And Voilà! My domain shows as verified.
I will get back to this topic, when I have more to share, but in the meanwhile go ahead and test it yourself and let me know if you have any questions.
There are multiple ways to manage and use Python with macOS, from using just system Python (comes with macOS) or managing it directly with Homebrew. I wanted to start from clean slate and here’s what I did. It will give you control which version of Python you are using and when. And no need for manual aliasing anymore.
First we need to install Homebrew. Homebrew is my go-to manager for applications. It keeps apps organised and updated, and it’s super easy to use. Install Homebrew by pasting the following command to your terminal. If you are not super confident with running random scripts from internet (like you should), you can download that .sh file and examine it. The command is copied from the site https://brew.sh:
Then we need Pyenv. Pyenv is a tool that lets you easily switch between the multiple versions of Python. Use this command to execute installation:
brew install pyenv
Now when we have Pyenv installed, we can install any Python version. I’m using at the moment the latest, which is 3.10.0, but you can install newer if it’s available. A list of available versions can be found on Python website. Install with the following command:
pyenv install 3.10.0
After you have successfully installed the needed version, you can set it to be the default version in any directory:
pyenv global 3.10.0
We also need to update your configuration file, macOS has moved using Bash to ZSH, but if you are not sure which shell you’re using, run: ps -p$$ -ocommand= (the output will tell you)
Then run the following commands to update your profile configuration file:
IF YOU ARE USING ZSH:
echo -e 'if command -v pyenv 1>/dev/null 2>&1; then\n  eval "$(pyenv init -)"\nfi' >> ~/.zshrc

echo 'PATH=$(pyenv root)/shims:$PATH' >> ~/.zshrc


IF YOU ARE USING BASH:
echo -e 'if command -v pyenv 1>/dev/null 2>&1; then\n  eval "$(pyenv init -)"\nfi' >> ~/.bash_profile

echo 'PATH=$(pyenv root)/shims:$PATH' >> ~/.bash_profile
To confirm you’re using the right version of Python, type:
python -V
You should see the installed version as output. And check that the PATH is working properly by typing:
which python
Output should be /Users/xxx/.pyenv/shims/python (except in xxx should be your account name).
And you’re ready to ro.. code! If you would like to use a specific Python version in your project just install it first (in this example I will use an older version 3.8)
pyenv install 3.9.7
Activate the version in ANY directory (globally) with:
pyenv global 3.9.7
Or just a specific directory with:
pyenv local 3.9.7
That’s it! I hope it makes your life easier, like it did mine 🙂 This was just a high-level guide, not going too deeply how things work under hood, but if you would like to dig into it, check the following link:
I have “No Ads, please!” label on my physical mailbox, but that works only for traditional ads. For my devices, I need to install an ad blocker to each browser and for some devices like my smart TV such doesn’t exist. Luckily, there is a solution for that and it is called Pi-hole.
Pi-Hole is a network-wide ad blocker. Instead of installing an ad blocker on every browser (and device), you can have a Pi-hole in your home network. It will block ads on all your devices, also on the smart TV. But it’s not a perfect solution, if ads are served from the same domain address, it will not block them. So unfortunately, you will still see ads on Youtube and some other services.
I listed a few benefits of using Pi-hole:
It will make your network faster, because when an ad is blocked, it’s actually prevented from being downloaded. And since these ad images, videos, and sounds are not being downloaded, your network will perform better.
It will protect your network from malware. You can also add additional block lists to your installation that will prevent the domains that are known to serve malware or act as a phishing site from ever entering your network.
It will block the ads in non-traditional places. Since the ads are prevented at the network level (before the ads reach the device), you can prevent ads from appearing on Internet-connected devices that aren’t Web browsers.
You can use it as a network monitoring tool too. You can find out what sort of traffic is happening on your network. (I have turned this feature off for privacy and to save my SD card wearing out)
It works as an internal private DNS server for your network. Usually this service is already running on your router, but when DNS queries are routed to Pi-hole, it will intercept any queries for known ad-serving domains and deny them to access.
I made a very simple setup guide for you and you just need a few things before starting:
Raspberry Pi with a case
Power Supply for Raspberry Pi (I used the official version)
SD Card (2GB+)
Network cable (not needed if you use a wireless connection)
Here is mine installed to cross-connect cabinet.
I won’t go to details how to install a Raspberry Pi OS, because there is good resources for that in here:
After you are done, connect to your Raspberry Pi with SSH.
First you need to set a static ip-address for your Raspberry Pi, you can achieve this with by configuring the file in /etc/dhcpcd.conf directory. Add following text to file and replace bolded characters with ip-addresses suitable for your home network:
interfaceeth0 #if you prefer wireless, use wlan0 instead of eth0
static ip_address=x.x.x.x/24 #replace x.x.x.x with preferred ip-address for your raspberry
static routers=x.x.x.x #replace x.x.x.x with you routers ip-address
static domain_name_servers=x.x.x.x #replace x.x.x.x with you routers ip-address
Reboot with command: sudo reboot. Remember to use your new ip-address when connecting to after reboot. Then run the following commands in terminal:
Finally, create a Docker container with the following command
sudo docker-compose -f docker-compose.yml up -d
You should be now able to connect your Pi-hole with a browser: http://ip-address (or hostname like http://hostname.local). Click Login and type your password.
I changed the privacy level to the Anonymous mode from Settings -> Privacy, because I have no need to track what queries are done and perhaps it will extend lifetime of the SD card.
Also Disabled query logging from Settings -> System for the same reason.
To have Pi-hole automatically used by all the clients on your network, you have to reconfigure your home router to use a different DNS server. By replacing the DNS server that your router uses with Pi-hole’s DNS server, it will mean all the devices on your network which get an IP address from the router, will use Pi-hole for DNS.
Log into your router as an admin.
Set the primary and secondary DNS server to be the ip-address of your Pi-hole you configured (You may also want to configure 1.1.1.1 has secondary DNS Server, if Pi-hole is down, but that may lead some queries forwarded to it even the Pi-hole is up and running)
If you don’t know how to change it, use Google. There are too many different routers to give step-by-step instructions, so try using Google by using the model of your router and “change dns server settings” phrase with it.
Save settings and reboot the devices.
Login to your Pi-Hole and you should start to to see the number of queries increasing.
Your Pi-hole setup is done, congrats!
P.S There are free mobile apps for controlling your Pi-hole in App Store / Play Store
Update: If you need to update your Pi-Hole, just login with SSH to your Raspberry Pi and execute following commands (in same directory where your docker-compose.yml is):
docker pull pihole/pihole
sudo docker-compose -f docker-compose.yml up -d
Since I saw Adam Savage showing off his Blade Runner blaster collection (link), I have always wanted to have my own, because I’m a huge fan of the movies. There are many different kits available on the market, but the Tomenosuke version is the one you should get, because it is by far the most accurate version. They have made different kits over the years, but recently they released the latest Stunt Model version which is the cheapest one, but still.. not so cheap, because it was about 360€ with customs.
Tomenosuke Blaster-2019 Stunt Model.
Because it is a Stunt Model kit version, you need to finish it by yourself. I also ordered a stand for it, so I can put it on my display. Searched from Etsy and found a deluxe version of the “detective special” stand.
Stand from Etsy.
So, to get started, the first thing was to remove excess plastic, from the sprue or from mouldlines. I used a pair of clippers and small files. Then, I sanded those surfaces, which I’m going to paint and used some alcohol to remove any grease.
Clippers and small files.
I bought some paints, varnish and brushes from Citadel. Citadel is known for high quality paints for the Warhammer figures, much better than those supermarket scale model paints.
Varnishing the barrel.
Painting was the hard part. I mean, I had no previous experience how to paint miniatures and I was afraid of ruining this piece. Luckily, it turned out to be easier than I thought. I applied a few layers of metal paints, some black paint and also tried to mimic the wear of the original movie prop. The kit came with a photo scrapbook of the original movie prop, so I could check what needs to be done.
Photo scrapbook and extra material (stickers and posters).
I used also a car wax for the grips to polish them and started to glue the pieces together.
Assembling the gun.
It took a few weeks altogether to glue and paint everything, because I didn’t want to rush. I had to switch from a plastic glue to a super glue, because the plastic glue didn’t hold so well.
Gun assembled.
I’m really happy for the end result, maybe in the future I will also get a metal kit from Tomenosuke, if it will be available again and get some prop ammo for this one.
Finally, I can put it on my display and start working on my next project. It was fun, but to be honest, building model kits is not my cup of tea. But 3D printing might be…
When I moved to my new house three years ago, I searched solutions how to control my garage door with my iPhone, especially through Apple Home(Kit). But I couldn’t find any cheap commercial solutions and HomeKit accessories were quite new and expensive back then.
So, I started to investigate DIY solutions and I was recommended a software called Home Assistant. It is a free and open-source home automation solution that usually runs on Raspberry Pi. It also has very wide range of device support (1600+ add-ons). Yay! I can integrate my vacuum cleaner to it.. And everything is controlled via a web-based user interface, but it also supports HomeKit, which I was looking for. Configurations are done with YAML files, but documentation is usually good enough and if not, forums are full of helpful people. I was already familiar with doing stuff with YAMLs.
I placed my Home Assistant over my garage door rails and bought also a Z-wave Plus USB stick to control and monitor other sensors in my home wirelessly. Garage door motor is controlled with relay which connects two pins in motor. The relay is connected to Raspberry Pi’s GPIO, where it gets its power, too.
Raspberry Pi running Home Assistant, Z-wave USB stick and relay controlling garage door. Three years, zero issues.
When the garage door is opened, the door sensor will send a signal to Home Assistant. I also get notifications if the door is left open for too long time.
Cheap door sensor connected to Raspberry Pi GPIO
I got some cheap Z-Wave Plus door sensors for other doors. These chinese sensors were 15€ each and I have them on every door leading outside.
Door sensor installed to front door.
I also wanted to play with interior lightning, so I ordered led strips from eBay. There are about 400+ leds controlled by the same relay unit, that controls garage door. My garage is starting to look like a cyberpunk bunker..
Neon lightning, because why not.
And all of this can be controlled through my iPhone, with the Home app. There is also Home Assistant app for it, but I wanted to control these from anywhere by installing HomeKit Hub in my network (iPad). Now, I can check from anywhere, if I left my front door accidentally open..
I have also some home security implemented, but for obvious reasons not going to share any of that in here.
Overall, I can highly recommend Home Assistant to anyone who is interested implementing home automation.
I can share more details if you like, this was just a high level introduction what I have done with it. So leave a comment, if there is something I should share with details..
Select My Workspace and click Datasets + dataflows. Click the three dots from your dataset and choose Create Report.
Let’s create line charts for temperature, humidity and air pressure. Each of them on a separate page. I’ll show how to configure the temperature first.
Go to Visualizations pane and choose Line chart:
Stretch the chart to fill your page and go under Fields and expand your table. Drag ‘EventEnqueuedUtcTime’ to Axis and ‘temperature’ to Values:
You should already see the graph of your temperature. You can rename Axis and Values to a more friendly name like Time and Temperature (Celsius). Change the color of your graph etc..
Add filter just next to the graph to show data from the past 7 days:
The end result should be something like this:
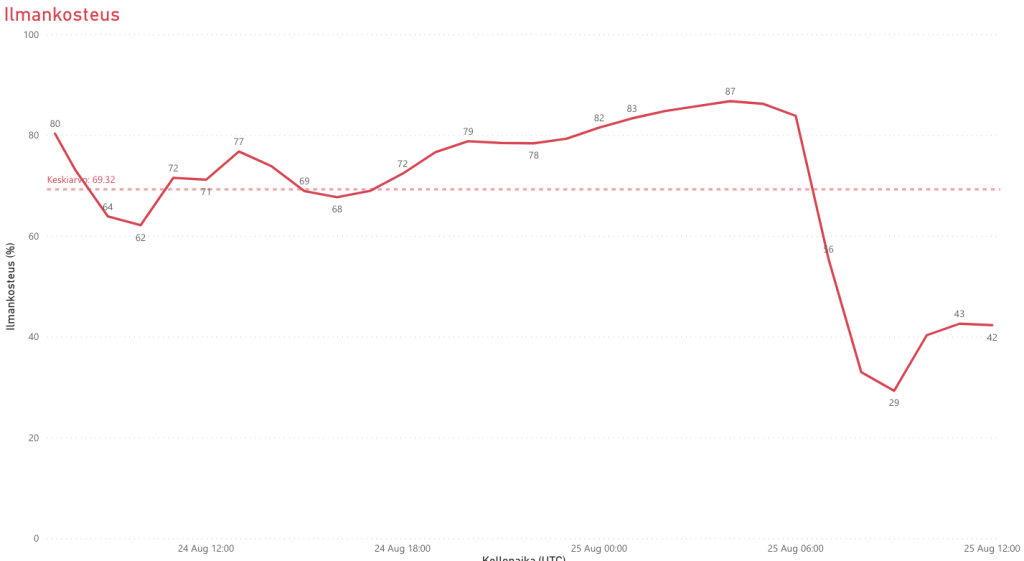
Temperature
Mine has been customised for Finnish language. It also has an average temperature line. Just for demo purpose, I placed my RuuviTag outside, so there are some changes for temperature (If you wonder why my floor temperature is 7 degrees at night..) You can add the humidity and the air pressure with the same method to the same page or you can create own separate pages for them. To make it more clear, I have separate pages for each of them:
Air pressureHumidity
I also added one page for minimum, maximum and average values:
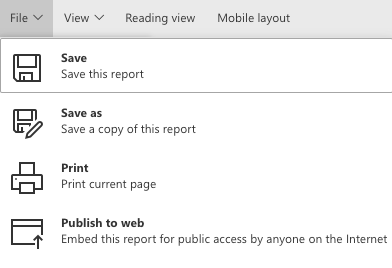
So go ahead and customize however you like and leave a comment if you have good suggestions for customization. Remember to save your report from File and Save. If you want to share it, you have an option to publish it to anyone with Publish to web.
After this, you can scale up your environment by adding more RuuviTags. This is the end of this series, thanks for reading and let me know if you have any questions!
Now we need to setup the Azure side and for that you need an Azure subscription. You can get a new subscription with 170€ of credits for 30 days with this link, if you don’t have anything yet:
As this is a demo environment, we do not focus heavily on security. You need some basic understanding how to deploy resources. I’ll guide you on the configuration side. Btw, If you want to learn basics of Azure, there is a nice learning path at Microsoft Learning:
IoT Hub is for receiving temperature messages from Raspberry Zero. Stream Analytics Job is for pushing those messages to the Power BI. The Automation Account is for starting and shutting down the Stream Analytics job, so it won’t consume too much credits.
Normally, we would deploy this process with ARM, but for make it more convenience to present and instruct, let’s do it from the Portal. And if you like, you can follow naming convention from CAF:
Start deploying the IoT Hub. Use a globally unique name and public endpoints (You can restrict access to your home ip-address if you like) and choose F1: Free Tier. With the Free Tier you can send 8000 messages per day, so if you have five Raspberry Pis, each of them can send one message per minute. Enough for home use usually.
After you have created the IoT Hub, you need to create an IoT Device under it. I used same hostname as my Raspberry Pi has:
Then you need to copy your Primary Connection String from your IoT Device:
After copying that string, you need to create an environment variable for your Raspberry Pi. You can use a script to automatically add it after every boot.
Here is an example how you create an environment variable:
Last thing to IoT Hub is to add a consumer group. You can add it under Built-in Endpoints and Events. Just add a custom name under $Default. Here you can see, that I added ‘ruuvitagcg’:
Next, you want to create a Stream Analytics Job. For that, you need only one unit and environment should be Cloud. There is no free tier for this and it costs some money to keep it running. Luckily, we can turn it off whenever we don’t use it. I used the Automation Account to start it a few minutes before I receive a message and turn it off few minutes after. There is a minor cost for the Automation Account also, but without it, the total cost would be much higher. I receive a message only once per hour, so Stream Analytics is running only 96 minutes every day, instead of 1440 minutes. The total monthly cost is something like 4€. Normally it would be almost 70€.
Next, head to Stream Analytics Job and click Inputs.
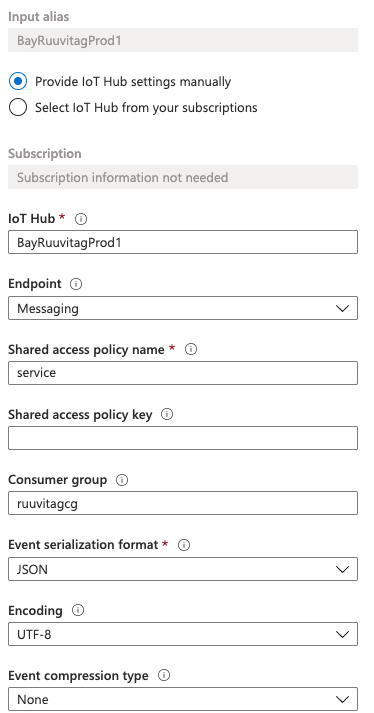
Click Add stream input. Above is my configuration, you just need to add your own consumer group configured earlier. For Endpoint, choose Messaging. Use service for Shared access policy name (It is created default with a new IoT Hub).
Now, move on to Outputs and click Add. Choose Power Bi and click Authorize, if you dont have Power BI yet, you can Sign Up.
Fill in Dataset name and Table name. For the Authentication mode, we need to use User token if you have a Free Power BI version (v2 upgrade is not yet possible in Free).
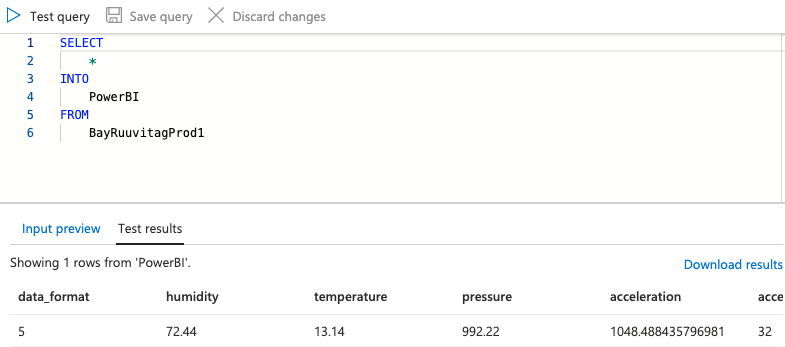
Then create the following Query and click Test query, you should see some results:
Now, the only thing to do is to visualize our data with the Power BI. We will cover that part in the next post, but the infrastructure side is ready to rock. Grab a cup of coffee and pat yourself to the back 🙂
I actually did this a few years ago, but never wrote a detailed blog about it, so I thought now would be good time for it.
We moved to a new house three years ago and since then, we have had issues with floor temperatures. It’s hard to maintain steady temperature for all rooms and I wanted to build a solution to keep track of it and see temperature trend for a whole week. That way, I know exactly what’s happening.
I will guide how to setup your own environment using same method.
First, you need temperature sensors and those I recommend RuuviTags. You can find detailed information at their website, but they are very handy bluetooth beacons with battery that lasts multiple years. You can measure temperature, movement, humidity and air pressure. There is a mobile app for them also, but it only shows current status, so it didn’t fit to my purpose.
So, I needed to push data to somewhere and an obvious choice was Azure. I will write more about Azure side of things in the next part of the blog. But in this part, we will setup a single RuuviTag and Raspberry Pi for sending data. You can add more RuuviTags later, like I did when everything is working as expected.
First, I recommend updating RuuviTag to the latest firmware. This page has instructions for it:
I used an iOS app called nRF Connect for it and it went quite smoothly. You can check that your RuuviTag still works after updating with Ruuvi Station app:
You will also need Raspberry Pi for sending data to the cloud. I recommend using Raspberry Zero W, because we need only WiFi and Bluetooth for this. I have mine plugged in my kitchen at the moment, but you will just need it to be range of the RuuviTags bluetooth signal (and of course WiFi).
Raspberry Pi Zero W with clear plastic case
Mine has a clear acrylic case for protection, a power supply and a memory card. Data is not saved to Raspberry memory card, so no need for bigger memory card than usual. I installed Raspbian Buster, because at time, there were issues with Azure IoT Hub Python modules with the latest Raspbian image.
Here is a page with instructions how to install a Raspbian image to an SD card:
After you have done everything, you need to setup Python scripts and modules. Two modules are needed: RuuviTag (ruuvitag_sensor) and Azure IoT Hub Client (azure-iot-device). And you need MAC of your RuuviTag, you can find it with Ruuvi Station App under Settings of your RuuviTag.
Then you need to create a Python script to get that temperature data, here is my script:
import asyncio
import os
from azure.iot.device.aio import IoTHubDeviceClient
from ruuvitag_sensor.ruuvitag import RuuviTag

#Replace 'xx:xx:xx:xx:xx:xx' with your RuuviTags MAC
sensor = RuuviTag('xx:xx:xx:xx:xx:xx')
state = sensor.update()
state = str(sensor.state)


async def main():
    # Fetch the connection string from an enviornment variable
    conn_str = os.getenv("IOTHUB_DEVICE_CONNECTION_STRING")

    # Create instance of the device client using the connection string
    device_client = IoTHubDeviceClient.create_from_connection_string(conn_str)

    # Send a single message
    try:
      print("Sending message...")
      await device_client.send_message(state)
      print("Message successfully sent!")

    except:
      print("Message sent failed!")

    # finally, disconnect
    await device_client.disconnect()


if __name__ == "__main__":
    asyncio.run(main())
Code gets current temperature from RuuviTag and sends it to Azure IoT Hub. You can see that this code needs IOTHUB_DEVICE_CONNECTION_STRING environment variable and you don’t have that yet, so we need to update it later.
You can put this code to crontab and run it like every 15min or whatever suits your needs.